Tuesday 23 June 2015

DIY : Tribal Mask

HELLO all wonderful people out there....

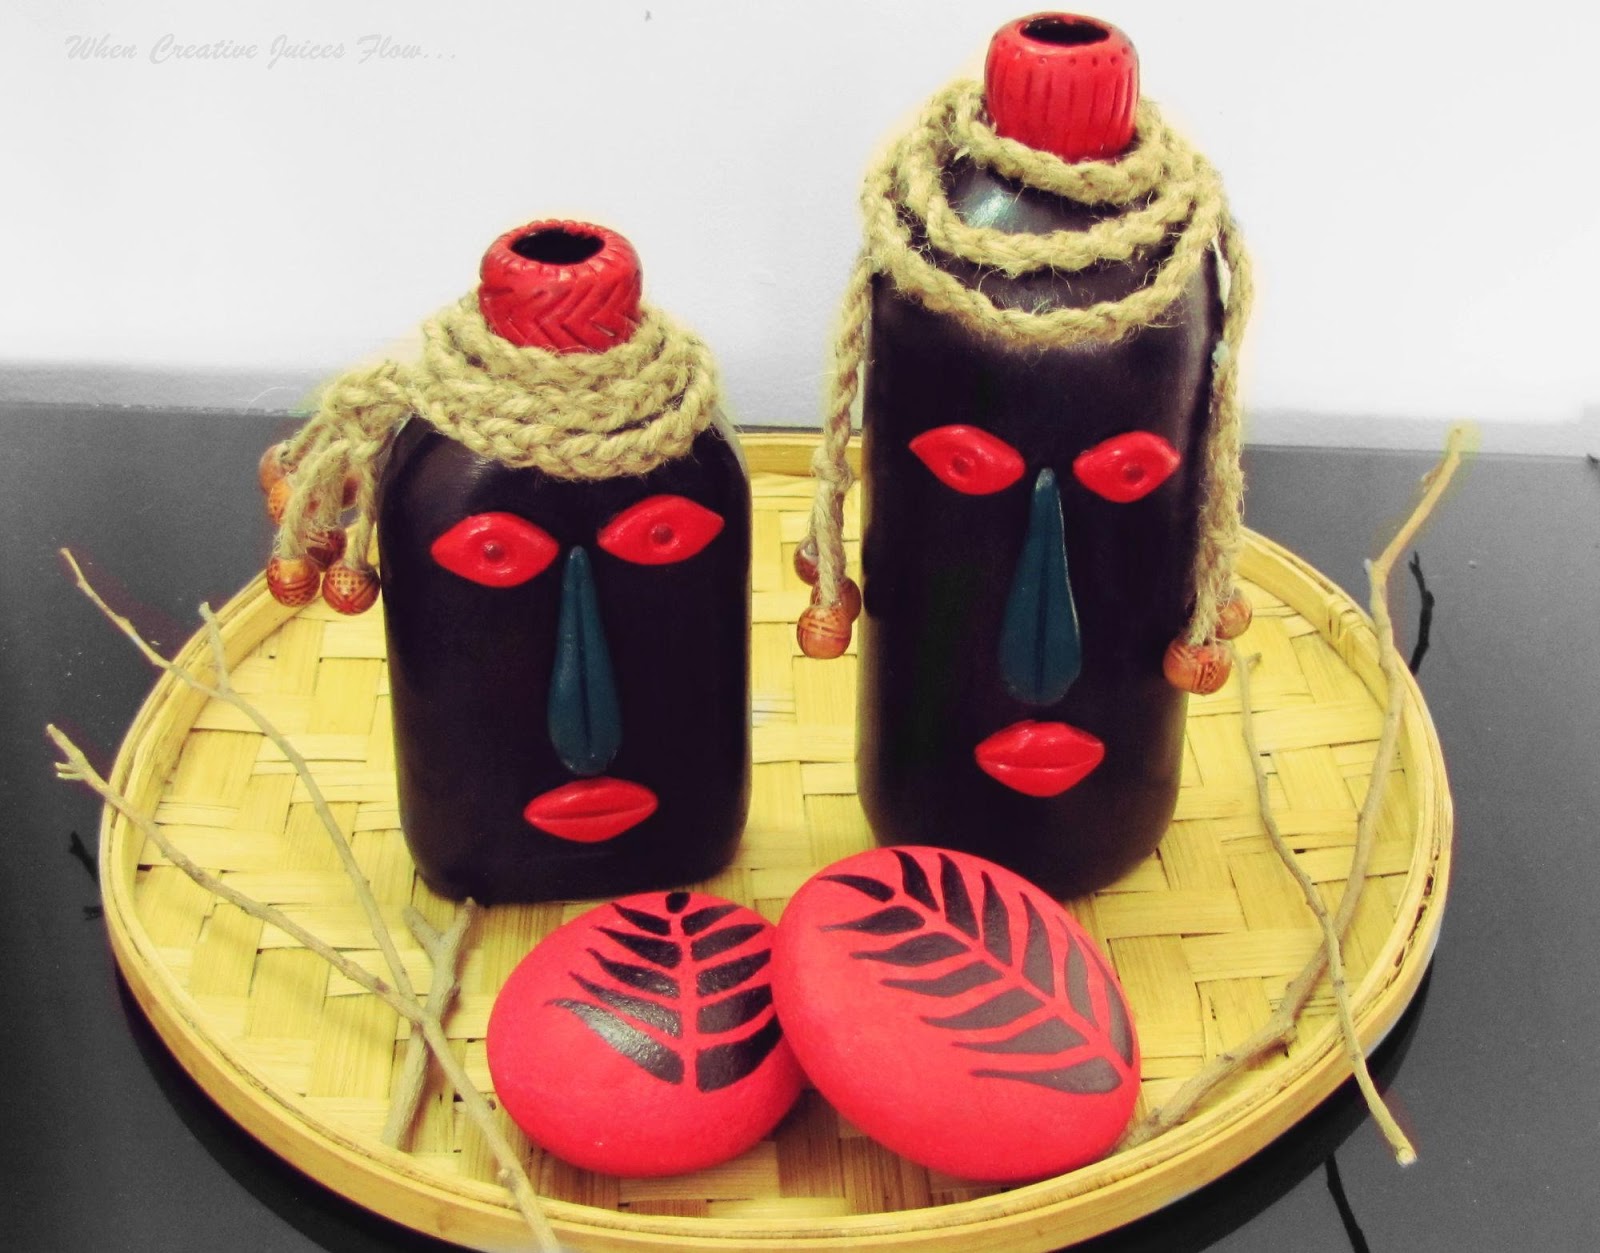
Here I am back with another DIY idea - A tribal mask. For a long time we (me and the man in the house) were searching for a couple tribal mask for the entrance of our home. Once visited a street side vendor who sells the terracotta masks. But there was no variety and what he had are very common. Even we have seen those at many known person's home. Then visited two popular home furnishing stores, but the masks there were too big according to our requirement. So we came back empty handed. Then sat in front of laptop and searched some online shopping sites. Finally got a pair of circular tribal mask of our choice *smile*, but our hard luck it was out of stock *sad*. Then when I saw him...he was gazing at me with raised eye brows and said "why don't you make one...ditto". As I love challenges, I accepted this challenge. Made a beautiful pair of mask..have a look....
Do you want to make something like this....here is the tutorial...

Items required
1- Paper Mache clay (click here to learn how to make it)
2- Some wire
3- White paper 
4- Fevicryl Shilpkar clay
5- Acrylic Paint 
6- Paint Brush 
7- Glue 
8- Beads 
9- Thread 
10- Plaster of Paris/white cement - 2tsp 
11- Few items to make the designs and impressions 
(Pen, paper knife, artificial earrings etc) 

Step-1 
I took a piece of wire around 4 c.m. and made a hook like the following picture. It is for hanging the mask. Then drawn a circle on paper. Made the circumference of the circle according to the size of the mask I needed. Then covered the circle with paper mache clay. With wet hand made its surface as smooth as possible. Inserted the hook slowly. Left it to dry for around two days. Made a mixture of white cement /plaster of Paris and water. Once the circle dried applied this paste by using a paint brush to make it completely smooth. Left it to dry for some more time. 

(Note: while carrying out this procedure place the paper over a tray or a card board or two three newspapers, as a single paper may torn out while moving it for drying.)
Step-2
After applying some talcum powder on hand I took equal portions of both mixtures of Shilpkar white clay. Mixed them well and by using this made the designs. In some places it was not sticking properly on the paper mache base so I used some glue. I made the patterns using a pen and a paper knife. Made the ear in such a way that the lower portion of it was not on the paper mache base and was slightly bulging out. Made a small hole on it, it's kind of piercing ears for earring *smile*.
Step-3
Made all the designs and all parts of the face. I made a couple. Both designs are almost same, only difference is made a mustache on man mask and a bindi on forehead and nose pins in the woman mask. I made some patterns by gently pressing an artificial earring on the ears and the jewelries on the forehead. Then painted it in brown, golden and red. Left it to dry for an hour. The beads I had were of different colours so first I painted those. Then took some beads and thread and made the earrings. Then tied the earring. 
(Note: can tie an artificial ready made earring directly) 
Once my masks were ready they moved to the entrance of our home and are now proudly hanging there. Everyone who visits us asks about them and their complement makes me blush *smile*. Now happy me and super happy the man in the house. 

Hope you liked this DIY and I am waiting for your feedback. If you have any ideas like this and want to share with me then you can share on my Facebook page or mail me at whencreativejuicesflow@gmail.com. I would love to see it. 

Soon I am coming up with a post on the entrance make over of my home. Till then stay tuned.

Sunday 21 June 2015

The First Rain

Today 21st June 2015 we all are observing World Yoga Day along with Fathers Day. The climate was good as Mr.SUN was not shinning with all his efforts like other Summer mornings of Delhi NCR. It's a Sunday and usually Sunday morning starts a little late at my place. These mornings are lazy mornings and all works are done at a low pace. But unlike other Sundays today the morning started little earlier, followed by an hour of Yoga. Then suddenly the climate changed. The sky seemed dark and darker gradually. First thought it's a regular dust storm like other days, which irritates me the most as it demands a rigorous phase of dusting. But after some time the dark and smoky clouds came, followed by the first downpour of the season. What a pleasant and lovely weather as the rain connected the sky & earth and brought a big relief from the burning heat of Summer. 

I couldn't resist the urge to take few snaps from my mobile and share with you all. This is the first time I am coming up with a post so instantly. *smile*

The first view of the clouds......
Viewing the rain from my tenth floor balcony.....


A tiny feathered creature waiting to fly to its home......

A Golen shower/ Amaltas/ Indian Laburnum tree after having a shower....
And a rainy morning is incomplete without the my cup of tea.... *smiles*

Wish you all a wonderful weather like mine....and Stay blessed....
Enjoy......


Friday 12 June 2015

Some Indian Beverages in this Summer

Monsoon will take some more time to reach my part of world. We are still experiencing all the features of ferocious summer the blazing sun, scorching heat, sweltering winds, all working together to drain the energy out of the body. Soaring temperatures reduce the appetite to eat and increases the urge for some chilled beverages. As cooking is my passion and now having summer vacation..this time tried to avoid all the preserved, fizzy, carbonated drinks and each time made some natural home made drinks for family and guests. So here are some quick recipes of few of them.

Ice Cream Falooda

Ice cream falooda…this is a very elegant and irresistible beverage. It is famous for its rich, soothing and aromatic flavors. Often I am confused that whether it should be called a dessert or beverage. Falooda means vermicelli and this is prepared by mixing rose syrup, sabja (basil seeds), and milk and for extra taste ice cream is also added. Along with other health benefits..sabja seeds are best body coolant and thus are mainly consumed during the summer time.
Ingredients: (For two regular servings)

Milk - 4cups
Sugar - 2tbsp
Falooda sev - 4tbsp (I use the regular vermicelli)
Rose syrup - 4tbsp
Sabja (Basil seeds) - 2 tsp
Rabdi (or condensed milk) - 2 tbsp
Vanilla ice cream - 2 scoops

Instructions:

1. Soak sabja in the water for an hour.
2. Take the milk and sugar in a pan. Let it come to a boil on medium heat. And then lower the heat and let it simmer for 5-7 minutes.
3. Then take out half of this mixture and chill it in the refrigerator.
4. In the remaining milk add the vermicelli and cook for 4 to 5 minutes.
5. When the vermicelli is ready chill it in the refrigerator.
6. Keep everything ready and refrigerated (basil seeds, milk, vermicelli), so that everything can be assembled just before serving.
7. Take two glasses. Add rose syrup 2 tbsp in each.
8. Then add cooked vermicelli.
9. Slowly add chilled milk.
10. Then add soaked sabja.
11. Top it up with rabdi and a scoop of ice cream.
12. Serve immediately.

Gulkand Lassi

Gulkand lassi is a soothing and aromatic drink made with yogurt and Gulkand (rose petal jam). Instead of going for the ready made Gulkand, I prefer the home made one for its color and flavor.
Ingredients: (For two regular servings)

Yogurt - 2 cups
Rose petals- 1 cup (Red rose but not the hybrid one)
Sugar- 1/2 cup
Lemon juice -1/2 tsp
Rose water- 1 tsp
Ice cubes
Water

Instructions:

1. In a pan add the sugar and a table spoon of water. Cook on a low heat till the sugar dissolves.
2. Keep few rose petals for garnishing and finely chop the rest rose petals.
3. Cook the rose petals in sugar syrup for few minutes.
4. Switch off the heat and add lemon juice & rose water.
5. Rose water adds more flavor & fragrance and the lemon juices stops the crystallization process of jam.
6. Now the home made gulkand is ready.
7. Take the yogurt, gulkand, water and ice in a blender. Blend until smooth.
8. If you want you can strain it with a strainer.
9. Garnish with rose petals and then serve the chilled lassi.
(You can make gulkand in this method and store in freeze for more than a week and can use it whenever you want)

Bael Panna (Wood Apple Drink)

Bael panna or sharbat is another popular drink in summer for both its flavor and health benefits. This fruit is only available during this time of the year and is best known for keeping various stomach and intestinal problems at bay.
Ingredients: (For four regular glasses)

Wood apple -1 small size
Sugar -1 cup
Yogurt - 1 cup (optional)
Water - 2 glasses
Pepper powder - 1/2 tsp

Instructions:

1. Break the wood apple and using a spoon scoop the pulp. Avoid the seeds. Keep this in a large bowl and pour a glass of water. Now mix with hand and squeeze the pulp.
2. Now strain this pulp using a soup strainer.
3. Now blend this pulp with all the other ingredients in a blender.
4. Serve Chilled.

Aam Panna (Raw Mango Drink)

Aam panna is another popular beverage to fight against the heat in Indian summer. In Odisha we get aam panna made of roasted green mangoes which prevents sun stroke. But it is little difficult to make the roasted one, so I am sharing another method of making aam panna that is also very good in taste as well as benefits.
Ingredients: (For four regular servings)

Green mango - 2 nos.
Mishri (crystallized sugar lumps) - 1 cup (Can use regular sugar also)
Salt -1/4 tsp
Rock salt-1/2 tsp
Mint leaves-1/2 cup
Roasted cumin powder-1 tspWater

Instructions:

1. First peel the mangoes and cut into pieces. Discard the seed.
2. Cook this mango pieces with the mishri and some water.
3. I cook this in pressure cooker for 5 minutes or till two whistles.
4. Once it comes to room temperature; shift it into blender along with all the other ingredients and blend it.
5. If one want to strain can strain it.
6. Serve chilled.

Kesar Badam Thandai

It is very famous north Indian drink. After winter especially it is made during Holi and then throughout summer. Many types of spices and nuts are used to make this recipe. A person who ever had it once can never forget its refreshing, cooling and aromatic flavors.
Ingredients: (For four small servings)

Honey - 1/2 cup (Can use sugar -1/2 cup)
Almonds - 8 to 10 nos.
Pistachios - 8 to 10 nos.
Cashew nuts - 8 to 10 nos.
Melon seeds – 2 tsp.
Poppy seeds-2 tsp
Whole peppercorn- 1 tsp
Fennel seeds- 1 tsp
Green Cardamom - 8 nos.
Saffron strands - 6 to 8 nos.
Milk - 2 glasses

Instructions:

1. Soak all the ingredients in a cup of water for 2 to 3 hours in freeze. (except honey and milk)
2. Grind these ingredients into smooth paste.
3. Now strain it by using a soup strainer.
4. Mix it with milk and honey.
5. Serve chilled.

Kokum Sharbat


Kokum is a tropical evergreen tree (Garcinia indica) found in Western Ghats region of India. It resembles with small purple plum. The dried Kokum can be used trough out the year. Kokum sharbat is consumed in many part of the country in summer to counteract the heat.

Ingredients: (For four regular glasses)

Kokum -1 cup
Black salt - 1/2 tsp
Roasted cumin seeds - 1 tsp
Sugar -1 cup
Regular salt - 1/2 tsp
Water

Instructions:

1. Soak Kokum in hot water for 30 minutes.
2. Grind this into a smooth paste. (You may feel a little stickiness in your grinder pot)
3. Now strain it by using a soup strainer.
4. Mix all the ingredients and then it’s ready.
5. Serve Chilled.
So enjoy the remaining days of summer with some refreshing chilled home made beverages which will satisfy your taste buds and are good for health too. *smiles*

Thursday 4 June 2015

DIY Mask Bottles

Hello everyone...
I am back again with my bottle obsession. If you are here in "My Creative Juices Flow" from quite some time then I think you are aware of my bottle love. Recently I tried to combine my bottle love with tribal mask love. Initially I was thinking of making some mask design on some clay pot, but later I thought as I have so many bottles, then why not with bottles. Here is the outcome and the tutorial for you. The pebbles in the following picture are also hand painted. They are my 2 in 1 pebbles, you must be wondering how?? Different things on different sides of the pebbles. Want to know how Click here.
Items required:
1- Glass bottle
2- Fevicryl clay / M-seal
3- Acrylic Paint
4- Paint Brush
5- Twine
6- Glue
7- Beads
Step-1
After applying some talcum powder on hand I took equal portions of both mixtures of Fevicryl clay. Mixed them well. I wanted to hide the thread marks of the bottle, so first I covered that portion. Then tried to give a smooth texture to it. By using a paper knife and a ball pen made some impressions and designs on it.
Step-2
After making some designs, first I took small small portions of the mixture to make eyes, nose and mouth. Then placed it on the bottle and gave them proper shape. Made the eyeballs and nostrils with a ball pen and some marks on the nose and mouth with paper cutter. Left it for around 30 minutes to dry.
Step-3
First I took three twines of equal length and weaved it; as we make simple hair plates. I was not satisfied with it, so at the end portion of it I glued some beads. Like this I made two for both the bottles. In this time the clay dried and then I painted it. (You can use any colour of you choice.)
Step-4
In the last step I glued the twine plates on the bottle. (Use a very little amount of glue to stick it and after sticking don't try move it, as the paint may come out. You can follow any design.)
A happy corner of my living room with my cute tribal bottle couple *smile*. You can get more ideas about my other creativity with bottles from here.