Monday 28 March 2016

Channapatna Wooden Toys

Channapatna toys have got this name from the place where they are manufactured. Channapatna is a small town near Bangalore, India. These are a special variety of wooden toys and dolls. Traditionally these toys were made by lacquering either ivory wood or rosewood or sandalwood, with organic, non-toxic vegetable colours. Now recycled pine wood and beech wood are also used to make the toys. 

History of these toys dates back to the era of Tipu Sultan, the ruler of the Kingdom of Mysore from mid 18th century to the end of 18th century who invited artisans from Persia to teach the the local artisans to make wooden toys.

This toy industry has experienced many ups and downs with no proper backing and marketing. Still it has evolved and transformed itself to compete with the growing market. Now we can get a variety of home decor accessories, dinning utilities, kitchen wares and many more varieties along with the traditional toys and dolls. I have even come across many on-line stores selling these toys exclusively. 

From a long time I was wishing to have some of these and few days back they made an entry into my home...have a look what I have got *smiles*.

The first snap I took, just after getting the items...
Falling in love again and again with the musician set. 
A two in one product- a fridge magnet cum planter...
And some pretty yellows..."the beautiful ladies"
Now I am a proud owner of these beauties...
Don't you think my selection/collection is good *smiles*

Wednesday 23 March 2016

Instant Dahi Wada or Bread Dahi Wada


First of all a very very very 

Happy Holi To You All....

This recipe is dedicated to all those "who love to cook, but don't have time to cook". During festivals we all should be ready with some quick recipes for guests. Today I am sharing one of my all time favorite recipe that has rescued me many time when I had to serve something handmade but didn’t had enough time for preparation. This is for all lazy girls and boys who want to eat something very tasty, tangy, yummy, but don’t have much time and patience for cooking. 

Ingredients for making 4 Wadas
1- Bread slices-8
2- Boiled Potato-2 to 3 (medium sized)
3- Yoghurt- 2 cup
4- Green chilies (Chopped)- 2
5- Onion (Chopped )-1 (medium sized)
6- Coriander Leaves ( Chopped)- 2 tsp
7- Fried Cumin Powder - 1/2 tsp
8- Chili powder - 1/2 tsp
9- Salt
10-Black Salt
11- Pomegrante- 2 tbsp (optional)
12- Sugar-2 tbsp

13- Tamarind Sweet Chutney
14- Coriander Chutney
15- Fine Sev/Bhujia- 2 tbsp

Step-1
Make a mixture of yogurt, sugar and salt (according to taste). In a bowl mix boiled mashed potato, half of the green chili, onion, coriander leaves, fried cumin powder, chili powder, salt, pomegranate seeds and black salt. Keep half of these ingredients for garnishing.
Step-2
Cut the bread slices in round shape by using a cookie cutter or use a stainless steel glass as I use. Two bread circles are required for one wada.
Step-3
I also cut a small hole in the middle, to give it the look of a wada. You can use a doughnut cutter to give the exact shape of wada. Now fill the potato mixture in the bread like sandwich.
Step-4
Once the stuffing is filled, take around half cup of yogurt mixture in a plate and on that place two stuffed bread.
Step-5
This is the last step, now we have to assemble all the things together on the serving plate. You can keep all the items ready and do this step just before serving. Add tamarind chutney, coriander chutney, chopped onion, green chili, coriander leaves, chili powder, fried cumin powder, pomegranate seeds. Top it up with fine sev. (A quick recipe of tamarind chutney and coriander chutney is at the end of this post)


Hope you will like this recipe and I bet if you will serve something like this to your family memebers or friends you will become a cooking star just in one day *smiles*. 

Coriander Chutney
1- Coriander leaves - 2 cups chopped
2- Green chilies- 1 or 2
3- Tomato- 2 cups chopped
4- Garlic - 2 tsp chopped
5- Salt according to taste
(Grind all the ingredients together and chutney is ready.)

Tamarind Chutney
This chutney is usually a sweet chutney.
1- Tamarind-1/2 cup
2- Dates -1/2 cup
3- Jaggery- 1/2 cup
4- Salt according to taste
5- Red chilies-1 or 2
6- Fried cumin powder-1/2 tsp
(Soak all the ingredients in warm water for 30 minutes and then grind all the items together. Then chutney is ready.)

Monday 21 March 2016

DIY Flower Baskets

Hello peeps...
All set for the festival of colors?? Do you have any special plan for this Holi?? I wanted something colorful and something new to decorate my coffee table, especially for Holi. So that called for a DIY work. And when DIY activity comes to mind, first priority is always something which is BEST OUT OF WASTE. This time I tried to make some flower baskets with old newspaper and invitation cards. 
Items Required
1- Newspaper 
2- Invitation Cards (Can use chart papers of different colors. I had invitation cards, that I had colored using acrylic paints) 
3- Glue 
4- Scissors 
5- Paint Brush 
6- Acrylic Colors 
7- Thread 
8- A Pen/Pencil 
9- A thin stick or a wooden skewer 
10- A Piece of Corrugated Cardboard Sheet 
Step-1 & 2 
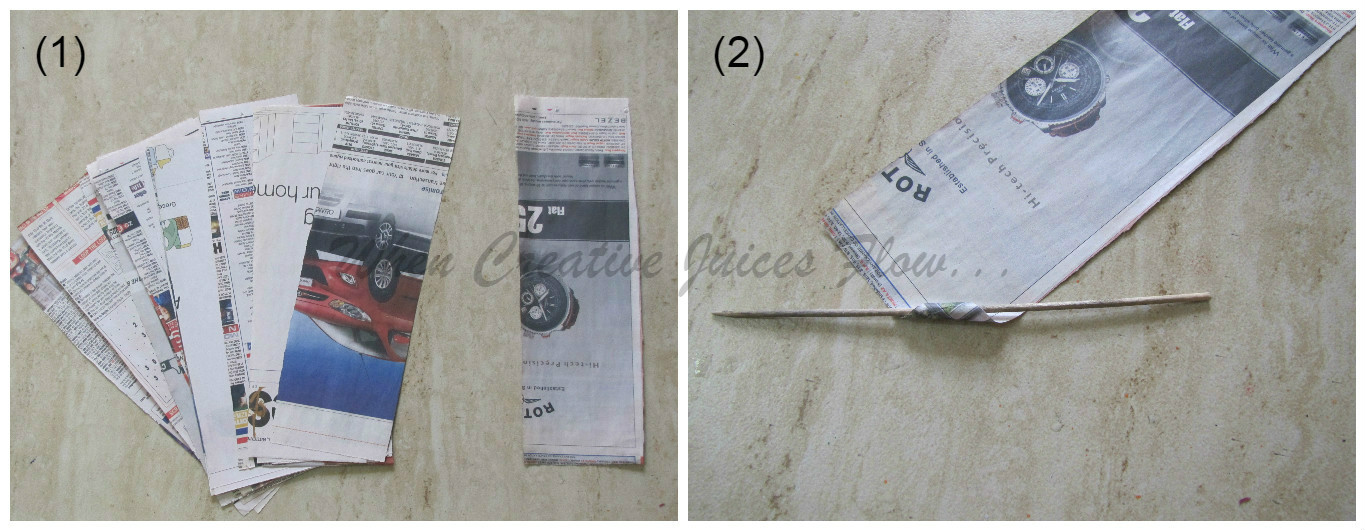
Cut newspaper into 3/9 inch pieces. From one corner start rolling the paper using a stick. 
 
Step-3 & 4 
While rolling the paper keep on pulling the stick from one end. Once done apply some glue at the end. Then pull out the stick. 
 
Step-5 & 6 
Make around 15 sticks to make one basket. Draw circles (around 8 to 10 c.m. diameter) on corrugated cardboard sheet. For one basket we need two circles. 
 
Step-7 & 8 
Cut the circles and then glue some newspaper sticks on a circle as the picture below. 
 
Step- 9 & 10 
Apply some glue all over the circle and on that stick another circle. 
 
Step-11 & 12 
Now on that keep any heavy object, so that both the circles will stick to each other properly. I placed a plastic jar on it for 30 minutes then it was ready.
 
Step-13 & 14 
Roll a newspaper roll on finger or on a pen. By doing this it will become little flexible and we can easily weave the basket. Glue one end of the stick on one stick and leave for few minutes, so that it will fix. Or else you can put a clip on that, which you can remove later on. 
 
Step-15 & 16 
Now start weaving the basket. We have to alternatively move the stick inside and outside around those sticks which we have glued on the circle in step-8. When one newspaper stick ends then apply some glue on another stick and insert it inside the first one. 
 
Step-17 & 18 
Once our basket's depth becomes around 10 c.m, then it is done. Leave around 2 to 3 c.m. of the newspaper stick from top and cut the rest of it. 
 
Step-19 & 20 
Now fold the sticks inside the basket and apply glue on it. I used some clips to set it fast. 
 
Step-21 & 22 
Once the glue dries completely and basket is ready, next step is coloring it. I used light brown color, so that it will look like as if it is made of some natural fiber. 
 
Step-23 & 24 
Take chart paper of any color and cut the petals. I have cut the petals in oval shape, you can cut it in any shape and size. Fold the petals from the middle, so that we can easily tie up them. I have cut some thin strips also to add at the center portion of the flower. 
 
Step-25 & 26 
Tie the petals together with thread. I made around 5 such flowers for each basket. 
 
Step-27 
Once the flowers are ready, then glue them on the basket. I filled one single color flower in one basket, you can fill according to your choice.
Now they are ready. You can make any number of baskets according to your wish and your patience *smiles*. 
Do find some time to share your view on this DIY. 
If you have any DIY ideas that you want to share with others then write to me at 
whencreativejuicesflow@gmail.com. I'll love to make a post on it. 
Enjoy your Holi, but don't waste much water as summer has already knocked on our doors and many part of the country facing water scarcity. *smiles*

Saturday 12 March 2016

Some Sweet Suprises in February

Hello Readers...
From last one month I am neck deep in work, both at home and office. This is keeping me away from this space and I am not able to find time for any post or for my all time favorite DIY activities. But as it is said everything can't be negative at the same time, the LOVE month of February gave many sweet surprises.

The most important surprise was I met my nephew (also my sis-in-law, see Bhabi I mentioned you *wink*) after around 2 years. When I have seen my nephew last time he was only of 3-4 months old and now he is 2 years and 2 months old. I hope you can understand how joyous it is to see the little growing and I was trilled to see all the tantrums the kids do now a days.


Other surprises the month offered me were somewhere directly or indirectly related my passion for art, craft and decor.


First Surprise- Everyone who is related to me, whether my family members, my relatives, my friends and even my domestic help, all are aware of my madness about decorating my home and collecting various décor accessories. My domestic help had been to her village last month and when she returned, she had came with these beautiful cowbell. She handed me this and said "Bhabi aapko aisi cheejein pasand hain na, issliye main apke liye ye layi hun" (You love this kind of items so I have come with this). This act by her brought tears of joy in my eyes.

Second Surprise- I won the Colour of the Year Contest by Good Homes Magazine India. Here is the gift that I got. Thank you so much Good Homes Magazine India's team for sending me so beautiful and functional gifts. Just love the tissue paper box and the candle stand.
Third Surprise- There is a very sweet girl in my office. She is working as an intern with me. We share a special bond and she is also a follower of When Creative Juices Flow. One day for no special reason she felt like painting a clay pitcher so beautifully and again for no special reason she felt like gifting it to me. Have a look on her hand painted pitcher..isn't her work quite appreciable.
Fourth Surprise- I am a regular follower of décor and creative Blogs since long, even before entering into the world of blogging. Some blog owners give amazing gifts to their amazing readers through giveaway. When the steps to participate in the giveaways are quite simple, I may win or may not, I always love to participate. Last month I won the Valentine Day giveaway organised by one of my favourite blog Design Decor and Disha in association with Candeberg. Got a dozen of flickering tea light realistic led candles with laser cut paper wraps. Now time to time they enhance the beauty of my home. (You can also order these candles from amazon.in)
At an aggregate the month of Love was great....
Hope you all also had great time and had celebrated Valentines day in a wonderful way *smiles*.
I promise I'll try to be more regular at this space in coming days.