Showing posts with label Recycle Reuse Reduce. Show all posts

Tuesday, 12 July 2016

DIY: Book End Holder

Ohh... this bottle obsession, this is going to stay with me forever and I am going to share my creativity with bottles with you the same way. I have made a bookend with a bottle. We can find so many varieties of bookends, made of wood, metal or any other heavy material. I was in need of it since long. But before purchasing, the DIYer in me thought of giving a try. Few simple steps and it's ready. 

Items Required:

1- A bottle
2- Colours for painting the bottle ( Acrylic or oil based paint)
3- Paint brush
4-A small chunri (I used a chunri that we generally use in worshiping goddesses in India and can get it from any store selling Puja items.) 
5- Glue (I used Fevicol)

Step-1

Paint a bottle in any design. I have already shared some methods of painting bottles. Here I have used a plastic bottle of one litre capacity, as a small bottle will not be heavy enough to stack and hold the books together. First given a base coat of oil based paint and then painted a Bengali bride on it using acrylic or fabric colours. Purposefully I have not given the painting a clean look. You can make any painting of your choice. Let the colours dry properly.
Step-2
Then fill in some sand or soil in the bottle. Remember the soil or sand should have no moisture at all.
Step-3
Tightly place the cap or you can also glue it. Then apply some glue and stick a small chunri. Let the glue to dry for some time. And the bookend is ready.
Engage yourself in some best out of waste DIYs. Then admire your work, feel proud and be happy *smiles*. 

Sunday, 26 June 2016

Painting some fruits of Amaltas tree

A golden shower tree or Indian Laburnum or more commonly known as Amaltas, when it is in full bloom with bright yellow hanging bunches of flowers is extremely beautiful can steal anyone's sight. 
A Golden shower tree in my office campus, before a month and now. 
And what I did in this period??? I collected some dried fruits of it. Of course few colleague of mine encouraged and cooperated in this process. Few other gave some weird expressions with raised eyebrows. But nothing can stop us (creative people). A completely dried fruit of this plant is very sturdy like wood and this quality of the fruit gave me an idea *smile*. 
  
Then what I did is I painted them and result is here *smile*
I made some shapes randomly by using acrylic colors. Here is it on a side table in the living room. The pot in which I have kept this painted sticks is one of my DIY project. 


Sunday, 24 April 2016

DIY: Painting Glass Bottles & Jars

Decorating home with colourful bottles is an easy and inexpensive way. They can create drama and add life to your home décor. But we don’t get colourful bottles that easily. But nothing can stop us; we can make our own colourful bottles. I hoard glass bottles. The size and shape of bottle doesn’t matter, I hoard whatever I get. And those who are not new at When Creative Juices Flow are aware of what I do with them and how I give a new life to them. 


Before few days I got a request to make a post on how to paint glass bottles, but sorry I took so long to share this post. Though I am not an expert, still making a post on it *smile*


Glass bottles and jars can be painted by using different type of colors and following different methods like
1- By using acrylic colour
2- By using oil base paint and brush
3- By using glass colour
4- By pouring oil base paint
5- By using spray paint
6- By applying chalk board paint
7- By using food colour, modge podge
…..and even many more methods are there.

I have tried my hand with all these methods, except the last one method. But I mainly use the first two methods as they have always given me the best results, as expected. Whatever method we follow first step is always wash, scrub the labels (soak them overnight), clean and dry them.

1- By using acrylic colour
The items we require in this method are
· Glass bottle/jar
· Acrylic paint
· Paint brush
· Varnish or touchwood
On the above bottle I have tried to make a Pattachitra painting and all colours used are acrylic colours. 

Method:
Acrylic colours are hard to clean, so I always line my work area with newspapers. Take generous amount of acrylic paint and apply directly on the clean and dry glass bottle. Move of the paint brush should be in one direction and as smooth as possible, to avoid streaks. We can apply multiple coat of paint also. If not happy with the result it can be washed at this step. If satisfied with the result leave it to dry for two three hours. After this I love to add a coat of varnish on the bottle. It gives a glossy look and a protective finish without affecting the original colour of the bottle. Allow the varnish to dry (around 3-4 hours). Then you can do any design on the bottles, by using again acrylic paint or can even try decoupage on it. After making the designs again apply a coat of varnish.

2- By using oil base paint and brush
Items required are
· Glass bottle/jar
· Oil base paint
· Paint brush
My checker board printed bottle using oil base paint and permanent marker.

Method: 
Painting bottles with oil base paint is same as acrylic paint. But it takes comparatively more time to dry (around 12 hours). But there is no need not coat it with Varnish, as oil paints itself gives a glossy look and are waterproof. Once the paint dries can make any designs using acrylic paint, follow decoupage and even make designs & patterns using permanent marker. 

[Note: Oil base paints are even harder to clean than acrylic colours. So first line your work area with newspapers, even be careful about your hands. If colour spills or anything happens like that clean it first immediately with a dry waste cloth and then wash the area with soap of detergent. If still see the stains of the colour use thinner or kerosene. Nail polish remover also works.]

3- By using glass colour
The items we require in this method are
· Glass bottle/jar
· Glass colour
· Foam brush
My glass painted bottles. You can see some patterns made on the bottles, will show how to make those in another post.

Method:
Steps are completely same as painting with acrylic paint, but only thing is use foam brush. Avoid using normal paint brush as it will give you lots of streak marks and not give a smooth finish. We can apply multiple coat of glass colour to get the desired shade.If not happy with the result it can be washed easily at any time, even after drying. From my personal experience I have found that the bottles painted in glass colour are not washable and can be cleaned with a dry cloth. But we can fill water in it (avoid spilling) and keep fresh flowers in it.
[Can make designs on the bottle first by using glass colour outliner and then filling the designs with colour also.]

4- By pouring oil base paint
Items required are
· Glass bottle/jar
· Oil base paint
In the above bottle I have poured in oil base paint inside the bottle and have painted a face of Kathakali dancer by using acrylic paint on the bottle. 

Method:
Pour in sufficient amount of colour inside the bottle or jar. Move the bottle in such way that paint will cover all sides properly. Once all the sides covered properly pour out the excess colour again back into the colour tin. Let the bottle to dry for 24 hours. This is the easiest method, but it requires more quantity of paint in comparison to other methods. Another demerit is you cannot add water and keep fresh flowers in it. Oil base colours are water resistant. But in this method as we have applied the paint inside the bottle, so if we will keep water in it for long time and use it as a flower vase, the paint may come out.

5- Spray paint
Items required are
· Glass bottle/jar
· Spray paint ( It was not easily available in nearby market, so I got it from amazon.in)
· Gloves (optional)
· Washi tapes (optional, only if you want to make any deigns or patterns)
A spray painted bottle and some deigns are made by using decoupage technique along acrylic colour. 

Method:
Choose an open area for doing spray paint (I do it in my balcony) and then cover your work area with newspaper or plastic sheet. For me it is always convenient to use the floor as my work area, so first I cover the floor with newspaper. If you want to make any deigns or patterns cover the bottle with wish tape accordingly. Then spray paint the bottle. Leave it to dry for 3-4 hours. Then carefully remove the washi tapes. I love to apply spray paint as base quote and then make designs with acrylic paint.

6- By applying chalk board paint
Items required are
· Glass bottle/jar
· Chalk board paint (how to make your own chalk board paint visit my earlier post)

If you want to make a personalized bottle where you can write messages or quotes according to situation and occasion chalk board painted bottles are best for it. 

Method:
To find the detail tutorial please click here. 

7- By using food colour, mod podge
Bottles can be painted by using food colour and mod podge in two methods, by baking in oven and without oven. But I have not yet tried any of these two methods. Before few days came across this picture on google. It stole my heart, isn’t it a breath taking beauty. So thought of sharing it here. Please visit the site for detail tutorial.
(Image Source: homedeco50)

Hope this post will help you to beautify your glass bottles and jars, that you usually through away. It will be a great motivation if you will give a feedback after trying any of these methods.

Some of my art bottles....

Monday, 21 March 2016

DIY Flower Baskets

Hello peeps...
All set for the festival of colors?? Do you have any special plan for this Holi?? I wanted something colorful and something new to decorate my coffee table, especially for Holi. So that called for a DIY work. And when DIY activity comes to mind, first priority is always something which is BEST OUT OF WASTE. This time I tried to make some flower baskets with old newspaper and invitation cards. 
Items Required
1- Newspaper 
2- Invitation Cards (Can use chart papers of different colors. I had invitation cards, that I had colored using acrylic paints) 
3- Glue 
4- Scissors 
5- Paint Brush 
6- Acrylic Colors 
7- Thread 
8- A Pen/Pencil 
9- A thin stick or a wooden skewer 
10- A Piece of Corrugated Cardboard Sheet 
Step-1 & 2 
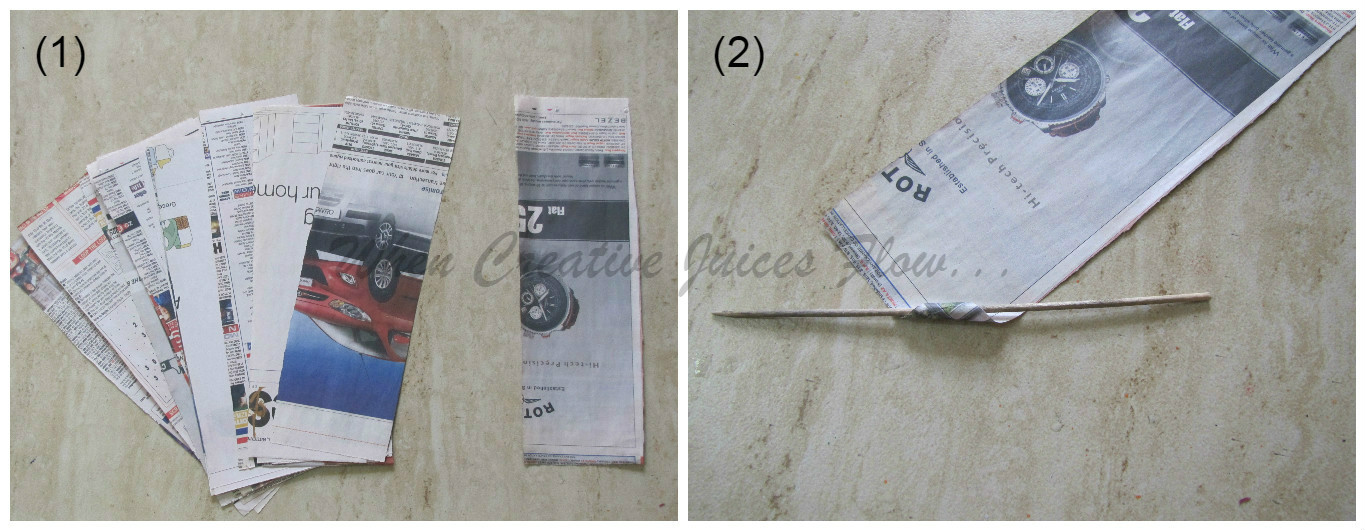
Cut newspaper into 3/9 inch pieces. From one corner start rolling the paper using a stick. 
 
Step-3 & 4 
While rolling the paper keep on pulling the stick from one end. Once done apply some glue at the end. Then pull out the stick. 
 
Step-5 & 6 
Make around 15 sticks to make one basket. Draw circles (around 8 to 10 c.m. diameter) on corrugated cardboard sheet. For one basket we need two circles. 
 
Step-7 & 8 
Cut the circles and then glue some newspaper sticks on a circle as the picture below. 
 
Step- 9 & 10 
Apply some glue all over the circle and on that stick another circle. 
 
Step-11 & 12 
Now on that keep any heavy object, so that both the circles will stick to each other properly. I placed a plastic jar on it for 30 minutes then it was ready.
 
Step-13 & 14 
Roll a newspaper roll on finger or on a pen. By doing this it will become little flexible and we can easily weave the basket. Glue one end of the stick on one stick and leave for few minutes, so that it will fix. Or else you can put a clip on that, which you can remove later on. 
 
Step-15 & 16 
Now start weaving the basket. We have to alternatively move the stick inside and outside around those sticks which we have glued on the circle in step-8. When one newspaper stick ends then apply some glue on another stick and insert it inside the first one. 
 
Step-17 & 18 
Once our basket's depth becomes around 10 c.m, then it is done. Leave around 2 to 3 c.m. of the newspaper stick from top and cut the rest of it. 
 
Step-19 & 20 
Now fold the sticks inside the basket and apply glue on it. I used some clips to set it fast. 
 
Step-21 & 22 
Once the glue dries completely and basket is ready, next step is coloring it. I used light brown color, so that it will look like as if it is made of some natural fiber. 
 
Step-23 & 24 
Take chart paper of any color and cut the petals. I have cut the petals in oval shape, you can cut it in any shape and size. Fold the petals from the middle, so that we can easily tie up them. I have cut some thin strips also to add at the center portion of the flower. 
 
Step-25 & 26 
Tie the petals together with thread. I made around 5 such flowers for each basket. 
 
Step-27 
Once the flowers are ready, then glue them on the basket. I filled one single color flower in one basket, you can fill according to your choice.
Now they are ready. You can make any number of baskets according to your wish and your patience *smiles*. 
Do find some time to share your view on this DIY. 
If you have any DIY ideas that you want to share with others then write to me at 
whencreativejuicesflow@gmail.com. I'll love to make a post on it. 
Enjoy your Holi, but don't waste much water as summer has already knocked on our doors and many part of the country facing water scarcity. *smiles*

Wednesday, 20 January 2016

DIY: A Bell for Your Garden

Hello friends....
Have a look, what I have made few days back!!
I think you all know about my DIY passion as well as best out of waste craze. I have made bells using some small clay pots, which are used to serve tea in some local tea stalls. Those which are famous as chai ke kulhad. I have made these on the request of a friend of mine, who is not at all a DIY kind of person. She wanted me to make some bells for her balcony garden. With her permission I have taken few pics of the final product as well as the steps of DIY for you all. So without wasting much time, let's move to it's tutorial. 

Items Required
1- Fine Sand-1 cup
2- Cement-1/2 cup (I had white cement, so I used it. Normal cement can also be used.)
3- Sand Paper
4- Plastic Thread
5- Aluminium Wire /Binding Wire (can get it from any hardware shop)
6- Wire Cutter
7- Small Ghungroos - 8 to 10
8- Acrylic Paint
9- Paint Brush
10- Small Clay pot (Kulhad)
11- Small Ring (I used rings of broken key chains)
Step-1
First by using a piece of sand paper make the surface of the Kulhad as smooth as possible and make a hole on the base by using any sharp object or a nail or using drilling machine. With help of wire cutter cut few pieces of wires of around 3 cm length. Then fold the wires as the image below. Now mix sand, cement and water. Don't make a very watery paste. It should be thick like the cement mixture used in construction of house. 
Step-2
Now make small balls of this cement mixture. Insert the hooks made of wire when the cement is wet. Don't disturb the balls and leave it for one complete day to dry properly. 

When I made this, had no idea about exactly what quantity of the mixture is required, so I used 2 cups of sand and 1 cup of cement. First I made the round ones, but had some more cement mixture left. Then I made different shapes, that I'll use in some other DIY. For this project I have used only the round ones. 

(You can directly make the cement balls by using your hands or can wear gloves while making these, as cement can make your hand very dry and rough. I feel my beautiful gang of ladies will not like to take any risk *smile*. If you are not getting gloves then, can at least cover your hands with polythene bags or else after making the balls immediately wash your hand with hand wash and apply sufficient moisturizer.)
Step-3
After 24 hours the balls are ready. To give it a smooth texture I made a mixture of cement and water (1:3 ratio) and applied a coat of that. Left it to dry for 10 minutes. After this applied a coat of white acrylic paint as a primer coat. 
Step-4
After applying the primer coat, paint it in your desired color combination. 
Step-5
Now using the plastic thread, tie all the small balls and some ghungroos. I used six balls in each bell as per the demand of my friend. 
Step-6
After tying the last ball, keep a gap (less than the length of the Kulhad) and then tie a piece of small stick or a button on the thread. If we will not do this one top ball will completely go inside the kulhad and can't be seen from outside. Then pass the thread through the hole and tie a ring tightly at the end, as shown in the following picture.
Then the bells are ready and this is how it looks... 

I took few pics of these in my living room...and then they are packed and went to their original destination. 

Now I am excited to see how these will look at my friend's balcony garden....

Have asked her to share few pics of her balcony, so that I can share with you all. 
I hope you will find this tutorial useful and let me know if you have made anything like this earlier. 

I have also made an urli using this method before 2-3 years, have a look... *smile*

Friday, 11 September 2015

DIY Corn Husk Flowers

When pitter patter falls the rain…most of us love to have roasted corn or the famous “Bhuna hua bhutta” in India. Now it has become a classic Indian street food during monsoons and even after. The aroma of roasted corn with the masaala and lemon brings lots of joys as well as it's a healthy option for some evening munching. 

Hey No No…I am not going to share its recipe with you all today. I hope you all have relished lots of roasted corn like me this monsoon and also going to have it for some more days, so now it's the time to make some flowers from corn husk. Yes, that corn husk which we usually throw away without any second thought. These flowers are very easy to make, inexpensive and can be stored for a long time.
Items required:
1. Corn Husk (Take 10-12 number of outer layers of corn husks, which are thick and big enough to cut the petals. Let it dry completely, but not sun-dried. I kept the fresh corn husks in my kitchen in a basket for a week where sun rays falls through the glass window. I kept on turning them daily.Then it was ready for making flowers.)
2. Wire for making the stem of the flower
3. Thread
4. Green tape
5. Scissors
6. Wire Cutter
7. Acrylic paint and paint brush (optional)                      
Step-1 & 2
Draw petal designs with a pencil on the corn husk. You can make any shape and size. Then cut the petals carefully and slowly with scissors. 
Step-3 & 4
Take a 5/5 c.m. of husk piece and fold it in half. Then take a piece of wire according to the length of your flower vase where you want to keep the flowers. 
Step-5 & 6
Then curl the husk as shown in the image below. Tie it tightly with thread.
Step-7 & 8
Then one by one tie the petals.
Step-9 & 10
Once your flowers are ready cover the stem portion with green tape. Make same leaves also. 
Now it's time to arrange the flowers and the leaves in any flower vase of your choice. That's all and it's ready. 

Initially I was thinking of colouring the flowers, but without colour also they looked awesome. Then I got confused that whether I should paint it or let it as it is. Then also asked my Facebook viewers their opinion. I got a mixed opinion, so for the time being I have not painted it. Thinking of enjoying its natural look for few days and after some days will paint it, to give another look *smile*.
   

I hope next time when you will bring corn, you will not simply throw its husk. 
I will suggest to make the flowers only when the husks are completely dried, so that I can be stored for long time. To increase its durability we can apply a coat of touch wood or varnish also.