Saturday 25 July 2015

Welcome to my balcony garden.............

Green - it's the colour of growth, colour of renewal, colour of life. It gives me energy and reasons to love and live life. I feel it doesn't matter whether we have a big garden or a partio or a porch or a balcony or a windowsill or a corner in our home, we can create our own green space there. The growing plants and the blooming flowers gives so much positive energy. To me space is never a constraint and have created my own green zone in my 10/4 feet balcony.The most pampered, nurtured and cared space in my home. Spending time outside has so much positive influence on mood. Breathing fresh air makes us more refreshed and energized. Have a look... my place with a small sitting arrangement for having the morning tea, evening coffee or for some silent conversation with self. 

Only to have few plants or greens is not sufficient. So I have added few handmade items to make the space more inviting and welcoming. I love neat and hassle free decoration, that's also reflected in this space.Here are few eye candies of my garden. In the picture below there is a small water arrangement with mother and baby swan and my handmade cactus pot. You can find the tutorial of this pot here and the handmade mushrooms here.
 
Below are few painted small clay pots, which were originally some rabdi handis. Next to that is a bird house made of a plastic food container, it's an borrowed idea from Ms Disha Mishra of Design Decor and Disha. 
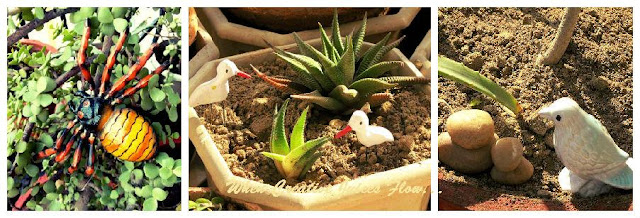
I love to add characters and drama to each place of my home. When it came to decorating my garden there were so many ideas. But I kept it simple and inexpensive. only one thing was in mind that what ever I am adding must be water resistant and sun proof. Below are few cute creatures roaming here and there in the garden. The big spider is a freeze magnet that looks better here. The cranes are made of M-seal and U-shaped hair pins. The small insect like creature is actually a plastic ball. All the rest items are made of clay, that I have only painted. Sometimes we think something and something else happens *sad*, example-the painting on the dog is a disaster..still sharing with you all. 
When we moved to this place only had 3-4 pots, the image on the left is of that time. The small hanging nest is one of my DIY work that I have made with coconut coir. I got this idea from some artisans who were selling such kind of nest in a fair. The hanging bird bath on the right image is also handmade. You can find the tutorial here
 
I don't throw things that easily. Few Chai Kulhad give the look of bells. I have painted some simple Warli designs on it. 
 
If we have a small space we should use the idea of vertical gardening. I have also used this concept in my garden. The hanging bottle planters and hanging coconut shell planters both are borrowed idea from Ms Disha Mishra of Design Decor and Disha
When we have moved to this place and I have set my very first balcony garden it was looking like the pictures below. This was also not bad *smile*. But in around these two years many new elements are added in the place and I also love to rearrange the things. In the evening when I switch on the little water fountain the gentle murmur of flowing water fills the space. 
So that's all about my little garden. I call it my little heaven. But the sad thing is that from those days we have moved to Delhi NCR, from a plant lover I have become a plant killer. With the passage of each harsh summer and each rude winter my plants struggle to survive. To give up easily is not my forte, so I keep on trying growing them. 

Let me know what you think about my little green space *smile*. I'll be very happy if this will inspire you somewhere

Tuesday 14 July 2015

Lord Jagannath made from Coconut Shell

This week we are going to celebrate the annual Rath Yatra (car festival) of Lord Jagannath in Puri, Odisha and many other parts of the country too. Lord Jagannath along with his siblings Lord Balabhadra and Devi Subhadra are worshiped in almost every Odiya home. As my roots are from Odisha I am deeply attached with this festival. Since I have entered into the world of blogging, now my ideas are not taking rest for a long time on the to do list and they get life whenever I have time. I thought this is the perfect time to make something for my home and also for my readers. This DIY can be done using all the items which are easily available at home.
Items required
1- Coconut Shells- 3
2- Old invitation cards (can use any thick paper)
3- Newspaper
4- Acrylic paint (Black, yellow, white, red)
5- Glue (Fevicol)
6- A stick for rolling the newspaper
7- Paint brush
8- Scissors
9- Pen / pencil
10- Items for decoration - Golden 3D out liner, beads
Step-1
I had cut the newspaper into 3-9 inch pieces. From one corner I started rolling the paper using a stick. While rolling the paper I kept on pulling the stick from one end. Once done applied some glue at the end. Then pulled out the stick. Made around 12-15 sticks.
Step-2
Then slightly flattened the sticks with finger and rolled it. Applied some glue on the paper while rolling. Made three rings from the paper sticks. For one ring 3 sticks are required. I had three coconut shells, two were of equal diameter (used for making Lord Jagannath and Lord Balabhadra) and one was smaller (used for Devi Subhadra). I had yellow, white and maroon colour invitation cards. Used the maroon colour card for Lord Jagannath. Placed a coconut shell on the card and first made an outline. 
Step-3
Then made some patterns like the following picture. On other colour cards also first made an outline of the coconut shell then made the same pattern and cut the designs. 
Step-4
Drawn some eyes, nose and mouth on the white invitation card with pencil. Sorry the picture is not very clear *sad*. Made completely round eyes for Lord Jagannath and Lord Balabhadra. Then painted the center portion of maroon card in black for making Lord Jagannath. Then painted its outer design in yellow. Similarly painted the outer design of white in yellow and that of yellow in pink. Painted the eyes nose and mouth.
Step-5
First placed all the parts on the face, then carefully glued them. Then by using a 3D out liner made some designs. Also made the tilaks and bindi on forehead. On Devi Subhdra's face made one nose ring. Left it for around an hour to dry. Then painted the coconut shells and the paper rings in black. 
Step-6
Then kept the back of the face upside. Applied glue on the edges of coconut shell and placed it on that. The edges of the coconut shells I used were not perfectly even. So after sticking the face designs on the coconut shell I placed them on a cushion and gently pressed it, by doing this all portions were perfectly glued. Left it to dry for an hour. 
Step-7
Applied some glue on paper ring and fixed this on the coconut shell as the image below to make the base. Likewise made all the three. The coconut shell I used for Devi Subhadra was very small and was not resting properly on one paper ring, so I used two paper rings as base. 

Now my Lord Jagannath, Lord Balabhadra and Devi Subhadra are ready. At last I decorated with some garland made with beads. Decoration part is up to you. You can add some more decorations too. You can engage your kids also while making this DIY. 

Hope you liked this DIY and I am waiting for your feedback. If you have any ideas and want to share with me then please drop a message on my Facebook page or mail me at whencreativejuicesflow@gmail.com. I would love to make a post on your idea *smile*. 

Tuesday 7 July 2015

Entrance of Our Home

Welcome….
Today I am going to share with you all the entryway makeover of our home. We stay in a rented apartment, so never thought of decorating or adding any personal touch to the entrance. But daily when I come back home and look at the blank wall so many ideas come to mind. Then each time I think someday I’ll do something, but that someday and something never came and more than a year passed. Finally during this summer I did it. 
An entrance to a home says a lot about the people who stay there. It creates the first impression on our visitors mind. From entrance they visualize the whole home. We wanted our guests to have a glimpse on few items at entrance while waiting for the door to open. 
At my place next to the door there is a less than 2 feet wide wall followed by the steps. First we thought of adding a name plate on the wall and few terracotta statues on the steps. But it was practically not possible as in our floor there are 5 more apartments and kids of age group 5-10 often play in the corridors. So we restricted our creative juices to flow within that wall only *smile*. We thought of adding a pair of mask, a name plate and a wall hanging. It was decided that the mask will be purchased and rest two I’ll make. But as mentioned in my earlier post I ended up making the mask too. 

First I made a name plate. I used a cardboard, some wheat straw, M-seal both black and white, acrylic paint, glue and few items for decoration like bells and a Ganesha. Have a look at it.
The first thing I did is I cut the cardboard in shape of a house. Made the brick like designs with M-seal. Then glued the wheat straws to make the roof of the house. Then glued a small Ganesha (it was on an invitation card) and bells. By using white M-seal made the letters and also two windows. After that painted all the designs. Still some M-seal mixture was with me so made two hearts and two tiny winy love birds (that represents us *smile*).
Then came my tribal mask. It's a couple mask. In my last post I have shared the tutorial. In case you have missed it, find it here.
Then I made a wall hanging using some small clay pots. It's very easy to make, only paint the pots and tie up by using some thread and hang it. Used red and golden colour so that it will go well with other items.
Now all of these three items together at entrance of our home are looking like this.
Still something was missing and was not happy with the look completely. So added some plants which are in plastic planter (keeping in mind the kids in the neighborhood *wink*) and some bell designs cut from an invitation card.
Initially the entryway was dull and boring. Here is a pic of how it was looking before transformation.
Hope you all will like how we transformed our entrance. A little effort, a little love and some creativity that's what our entrance speaks now *smile*.